How I Created My Own WiFi 6 Access Point
2024-08-09
Why though?
My current access point is a cheap Netgear WAC104 running OpenWRT that I found on ebay for $20. While it does work well for the price, the speeds aren’t the best, especially when I’m far away from it. It also uses the older WiFi 5 standard, instead of the newer WiFi 6 standard.
While I could buy a new WiFi 6 access point, they tend to cost more, and I don’t want to spend a lot of money on one. Creating one myself from spare parts I already have not only doesn’t cost any money, but is also more fun!
The hardware
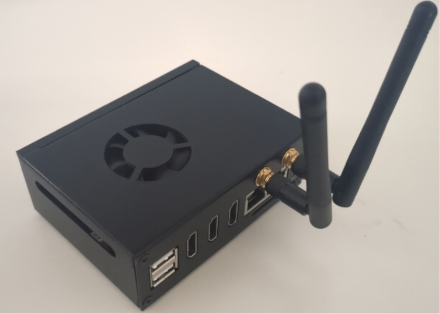
My access point is powered by an Orange Pi 5 Plus, with a Rockchip RK3588 SoC, 16GB of ram, a 512GB NVMe SSD, and dual 2.5GBe. While this is very overkill for just an access point, I thought it would be fun to see how well this works as one. This will most likely not be a permanent solution so I don’t mind using it for this purpose.
The most important piece of hardware for this is the WiFi chip. I’m using a MediaTek MT7922. This chip supports WiFi 6/6E (6E is unable to be used for the access point though, more on that later). While it was intended for consumer devices like laptops, it works (mostly) well enough in an access point.
A note for anyone trying this at home, the WiFi chip used matters a lot. It needs to support the correct frequency in AP mode. Modern Intel chips will not work for this, see here for more details.
The software
The Orange Pi is running postmarketOS, an Alpine-based Linux distro. I chose postmarketOS because I’m a big fan of it for being lightweight and easy to work with, and also I was the one who created the postmarketOS port for this device.
A few tools are needed for the access point. One of them being bridge-utils, which provides the brctl command for creating and modifying bridge network devices. The other one is hostapd, which is what creates the access point.
hostapd by itself doesn’t do anything except create an access point, which means that devices that connect to the access point are unable to communicate with anything else. A bridge is needed to connect the wifi interface to the upstream ethernet interface, which is connected to my router.
Before I can configure anything, I need to stop NetworkManager as it will try to take control over my network interfaces.
# rc-service networkmanager stop
Next, I need to create and configure my bridge interface br0. For this I need to know which ethernet interface is being used. ip a will show the status of every interface.
# ip a
1: lo: <LOOPBACK,UP,LOWER_UP> mtu 65536 qdisc noqueue state UNKNOWN qlen 1000
    link/loopback 00:00:00:00:00:00 brd 00:00:00:00:00:00
    inet 127.0.0.1/8 scope host lo
       valid_lft forever preferred_lft forever
    inet6 ::1/128 scope host
       valid_lft forever preferred_lft forever
2: eth0: <NO-CARRIER,BROADCAST,MULTICAST,UP> mtu 1500 qdisc pfifo_fast state DOWN qlen 1000
    link/ether c0:74:2b:fe:67:95 brd ff:ff:ff:ff:ff:ff
3: eth1: <BROADCAST,MULTICAST,UP,LOWER_UP> mtu 1500 qdisc pfifo_fast state UP qlen 1000
    link/ether 2e:13:c5:10:8d:37 brd ff:ff:ff:ff:ff:ff
    inet 10.69.0.198/24 brd 10.69.0.255 scope global dynamic noprefixroute eth1
       valid_lft 6988sec preferred_lft 6988sec
    inet6 fe80::c886:593b:9a47:5269/64 scope link noprefixroute
       valid_lft forever preferred_lft forever
4: wlan0: <BROADCAST,MULTICAST> mtu 1500 qdisc noqueue state DOWN qlen 1000
    link/ether 12:56:ff:43:13:2a brd ff:ff:ff:ff:ff:ff
eth1 has an ip address which means I want to add that one to my bridge.
# brctl addbr br0
# ip link set br0 up
# brctl addif br0 eth1
Now, eth1 is part of the bridge br0.
# ip a
1: lo: <LOOPBACK,UP,LOWER_UP> mtu 65536 qdisc noqueue state UNKNOWN qlen 1000
    link/loopback 00:00:00:00:00:00 brd 00:00:00:00:00:00
    inet 127.0.0.1/8 scope host lo
       valid_lft forever preferred_lft forever
    inet6 ::1/128 scope host
       valid_lft forever preferred_lft forever
2: eth0: <NO-CARRIER,BROADCAST,MULTICAST,UP> mtu 1500 qdisc pfifo_fast state DOWN qlen 1000
    link/ether c0:74:2b:fe:67:95 brd ff:ff:ff:ff:ff:ff
3: eth1: <BROADCAST,MULTICAST,UP,LOWER_UP> mtu 1500 qdisc pfifo_fast master br0 state UP qlen 1000
    link/ether 2e:13:c5:10:8d:37 brd ff:ff:ff:ff:ff:ff
    inet 10.69.0.198/24 brd 10.69.0.255 scope global dynamic noprefixroute eth1
       valid_lft 6824sec preferred_lft 6824sec
    inet6 fe80::c886:593b:9a47:5269/64 scope link noprefixroute
       valid_lft forever preferred_lft forever
4: wlan0: <BROADCAST,MULTICAST> mtu 1500 qdisc noqueue state DOWN qlen 1000
    link/ether 12:56:ff:43:13:2a brd ff:ff:ff:ff:ff:ff
5: br0: <BROADCAST,MULTICAST,UP,LOWER_UP> mtu 1500 qdisc noqueue state UP qlen 1000
    link/ether 2e:13:c5:10:8d:37 brd ff:ff:ff:ff:ff:ff
    inet6 fe80::6434:8fff:feaf:e880/64 scope link
       valid_lft forever preferred_lft forever
Next, configuring hostapd. I looked at various resources online for configuring hostapd, and found a github repo with pre-made configs for hostapd, including one for WiFi 6. I would have liked to use WiFi 6E instead of 6, but this chip doesn’t support 6GHz in AP mode. The config already had everything I need, including a line to use br0, so I simply copied it and changed the ssid and password. Before I can run hostapd, I need to unblock wifi with rfkill.
# rfkill unblock wifi
# hostapd hostapd.conf &
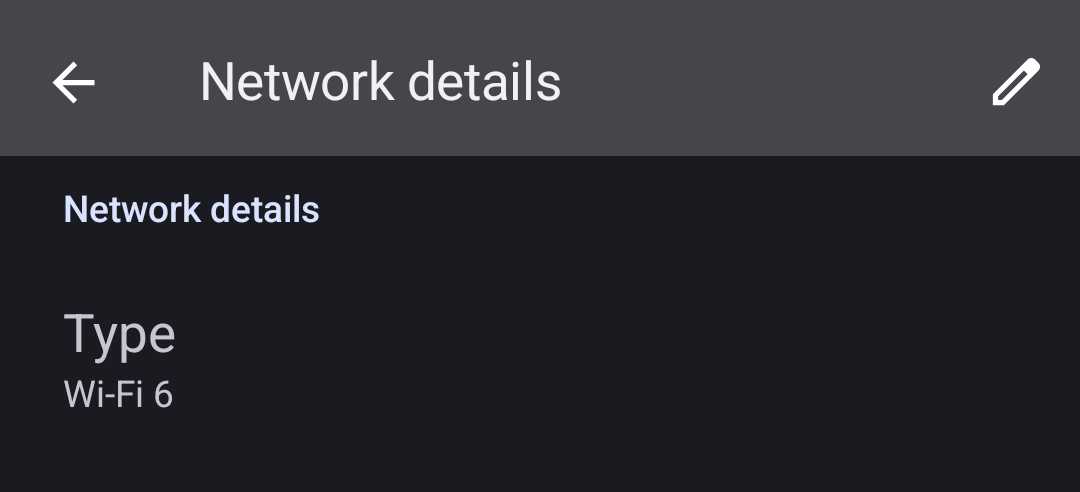
Now, I can connect to the access point from any device capable of WiFi 6. The screenshot below from my phone shows the WiFi type is WiFi 6.
How well does it work?
Very well!
WiFi 5 speeds:

WiFi 6 speeds:
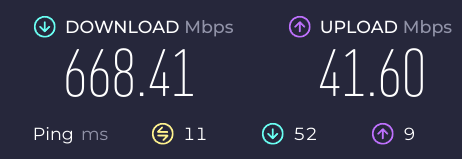
Over a 200 mbit/s improvement!
My final thoughts
I’m impressed with how well this works as an access point. I wasn’t expecting the improvement to be that great. Despite the improved speeds, I will not be keeping this as a permanent solution for a few reasons. One is I would like to use my Orange Pi for other projects, and I can’t do that if it is my access point. Maybe if I had a lower end SBC that is more fit for the task of being an access point I would keep using it. Another reason is the fan is quite annoying. The case fan is always on as it is directly connected to 5v over GPIO. The SBC itself has a PWM fan which while it isn’t on at all times, it’s more annoying than the case fan when it is on. And without the case fan, the board ends up being hotter.